


Whether you’re preparing to deploy a new wireless network or upgrade an existing one, understanding wireless network design and deployment strategies is essential. In this article, we describe some strategies and best practices for getting the most out of your Wi-Fi network.
The value of a robust network
Have you ever connected to a wireless network only to discover that connectivity is excruciatingly slow? The Wi-Fi icon indicates full signal strength, but you’re still unable to load that web page or send that email. Frustrating, isn’t it?
Unfortunately, this happens much more often than it should. You don’t want your network to display such behavior, especially when it’s used for your company’s productivity and operations. It is of utmost importance for your wireless network to provide a quality user experience, thereby safeguarding your investment. This can be done by taking into account some very simple yet vital principles and putting them into practice. Before reading through these design principles, it is a good idea to ensure that you understand the fundamentals of how Wi-Fi networks operate. If you’ve got that down pat, read on!
Step 1: Document the requirements
Before you install your first access point, or anything else for that matter, you must first clarify what you want to accomplish. Ask questions like:
- What physical locations do I want to cover? Outdoor? Indoor? Both?
- How many people will be using the network simultaneously?
- What kind of user density will there be? A thousand people in an auditorium, a thousand people spread out over 12 floors, or twenty people spread out over an outdoor common area?
- What services will be running over the network? Simple web access? Voice over IP? Video telephony?
- Are the users primarily guests that will connect only once and never be seen again or employees that will connect every day?
- What kind of user authentication do I want to use? Is it an open network or a subscriber-based network?
Answers to these questions will help you determine what kind of access points to purchase, how many, where to place them, what Wi-Fi standard you should employ, and how to integrate the Wi-Fi network into the wired enterprise network. These requirements should be well documented and used throughout the process to verify that everything conforms to them from start to finish. These questions will be referenced throughout the rest of the article and a clearer picture of what each entails will develop as we go along.
Step 2: Perform an initial site survey
One of the most important steps in the process is performing a site survey. This is a process by which the network designer physically visits all of the areas to be covered with a laptop running special software that contains floor plans of the potential coverage areas. The objectives of this initial site survey include:
- Specifying the location and number of access points. If the areas being covered will have a high user density, such as an auditorium, a higher density of access points should be installed. In low user-density scenarios, even a single access point for a large room would suffice.
- Determining the type of access point to be used in each location. High user-density areas require access points with more robust CPUs and memory resources. Wi-Fi standards that support higher capacities and speeds such as IEEE 802.11ac should also be used. If the areas being covered are much larger, or outdoors, and the user density is quite sparse, then Wi-Fi standards using the 2.4GHz frequencies, which can achieve connections over longer distances, would be preferable (e.g., IEEE 802.11n).
- Locating potential obstacles to Wi-Fi signals. Building materials such as metal rebar and dense concrete can be obstacles to Wi-Fi signals. Even human bodies present a sizable obstacle to signal travel. Drywall, tiles and wood, on the other hand, present less of a hindrance.
- Identifying incumbent sources of radio frequency interference. RF signals are found all around us. Electrical cabling, electrical devices, cordless consumer devices, and even neighboring Wi-Fi networks can present interference, so it is important to identify these sources.
- Choosing channels. The site survey allows the designer to determine which access points will be functioning at which frequencies. This way, the access points themselves won’t function as a source of interference and cause quality degradation for their neighboring access points.
As the survey is conducted, the designer should mark the location of all of these elements in the site survey software and make a note of potentially obstructive circumstances. It is always a good idea to conduct the survey with one or two of the customer’s techs in order to immediately clarify questions about specific areas.
Side note: Antenna theory
An important aspect of the site survey also has to do with the choice of antenna that will be used for each access point. Some access points have their antennas built in, while others can be fitted with external antennas. In either case, the antenna must be viewed as a passive component that simply redistributes the Wi-Fi signal in space. There are two primary types of antennas: omnidirectional and directional. The latter has some additional subcategories, but these are beyond the scope of this article.
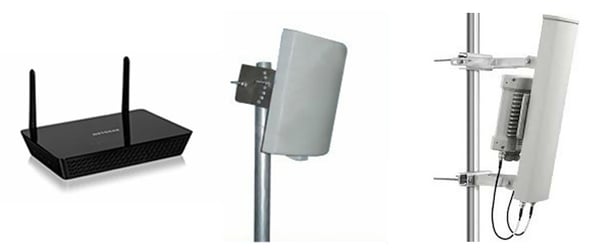
An omnidirectional antenna is composed of a straight, often flexible wire or rod and is commonly seen on wireless routers. It distributes the wireless signal equally 360° around the plane that is perpendicular to the antenna itself. The device on the left below is an example of this.
A directional antenna is one that concentrates the signal in one direction in space, depending on the orientation of the antenna itself. Such an antenna can be in the form of a square or rectangular panel, or an upright bar as seen below.
During the site survey, the type of antenna/access point that will be used in each situation is crucial in order to maximize the signal strength in areas where there will be users. For example, in the following diagram, we see two cases of an expected distribution of users and a relative location of an access point.

In Case A, the access point is close to the center of the user distribution. An omnidirectional antenna would be ideal in this case, as it has a signal distribution of 360° around the access point, providing an equally strong signal for all users around it. In Case B, a directional antenna would be preferable since the user concentration is only on one side of the antenna. If an omnidirectional antenna were used here, much of the signal strength would be lost to areas where there are no users, and the actual end users would receive a weaker signal as a result.
In addition, placing an omnidirectional antenna as high as possible, such as on top of a building, especially in an outdoor environment, seems to be very sensible. However, omnidirectional antennas emit their highest signal strength on a plane at right angles to the orientation of the antenna itself, so doing so would keep this region of greatest signal strength high above the heads of users, resulting in a poor-quality network. Omnidirectional antennas should be placed as close as possible to the ground, but still high enough to avoid theft or vandalism.
Antennas may not actually look like omnidirectional or directional, as their casings may hide their actual shape, so looking at manufacturer’s documentation is the best way to understand what kind of distribution you are actually getting. All antennas, whether built-in or detachable, come with a diagram of signal distribution. The following is an example of such a diagram for an omnidirectional antenna.
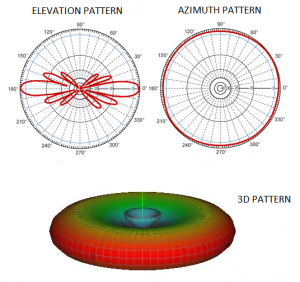 The elevation pattern shows the signal strength while looking at the antenna from the side, and the azimuth pattern shows the signal strength when looking at the antenna from above. Notice the complete 360° coverage in the azimuth pattern. The 3D rendering shows these two distributions in space.
Care should be taken when covering multiple floors. Remember that access points with multiple antennas may have an almost spherical coverage pattern, which means that an access point on the ceiling may allow connectivity to users on the floor above, depending on the building materials used.
Bottom line, when placing access points, care should be taken to ensure that the signal distribution provided by their antenna types will indeed maximize signal strength in areas where users will actually be.
Step 3: Design the network backbone
Once you’ve verified that the access point placement and type will bring about the required coverage for the expected user density and location, the next step is to determine how those access points will connect to the network backbone, to enterprise services, and to the internet. If the backbone is insufficiently provisioned, you may get the phenomenon of full signal strength with little to no connectivity.
Potential data rates per access point (AP) should be evaluated to determine the kind of traffic expected to be generated over a particular AP's connection to the network. This expected traffic will be affected by the number of estimated users per AP (user density), by the services supplied to each end user, and by the kinds of speeds that each user is given and may potentially use. The core network bandwidth must be able to handle the expected traffic so it doesn’t negatively impact the operation of the rest of the wired network.
In addition, segregating certain traffic onto separate VLANs may be required in order to employ traffic shaping and other QoS features necessary to ensure the quality of particular services that run on the network.
Step 4: Install the access points and deploy the network according to plan
Step 5: Perform the post-installation site survey
Once the access points are in place and the network has been deployed, the time comes for the second site survey. Whereas the first site survey was used to identify potential sources of RF interference, this site survey evaluates the signal distribution achieved and verifies that it conforms to the initial requirements. This is accomplished once again by using the same site survey software on a laptop with floor plans of the areas covered. Measurements are taken in all areas to generate heat maps that show the signal strength and distribution, as in the following image.
 This second site survey also allows the designers to modify and adjust some access point positioning, antenna orientation, or channel choices to further optimize the network. Also, dead spots or obstacles to wireless signals can be more clearly identified and rectified, as is the case depicted in the close-up to the right of the image.
Conclusion
By following a few simple yet vital principles, we can ensure an optimally performing wireless network. Documenting your requirements is a vital first step to safeguarding your investment and certifying that the network you deploy functions at the standards you need.
However, having implemented the network and providing robust connectivity to end users is only half the battle. The other half has to do with security, authentication, encryption, and the optimization of the network for particular services such as voice and video. These aspects of wireless network design will covered in future articles, so stay tuned!
You may also like:
Grandstream’s GWN7000 series Wi-Fi access points and Gigabit router
TP-Link Omada Cloud Controller
What’s so great about the Grandstream GWN7610


Comments